Azure AD Business-to-Business can initiate federation with google to allow users to use their own Google accounts to authenticate instead of using Microsoft Accounts.
Introduction
In this article, I will explain how to use Azure AD business-to-business (B2B) collaboration to securely share your company’s applications and services with guest users and external partners. In this guide, I will create a relationship between my Azure Active Directory and Google.
Prerequisites
In order to configure Google as an Identity Provider, you must check the following prerequisites:
- You must have a valid Azure AD B2B subscription
- You must be a global Azure AD Administrator
- You must have a Google Account to create credentials at Google APIs. In my case, I will use the following account: azureacloudab2b@gmail.com to initiate the federation.
- You must have a Google Account to test the federation. In my case, I will use testazureacloudab2b@gmail.com to validate the federation.
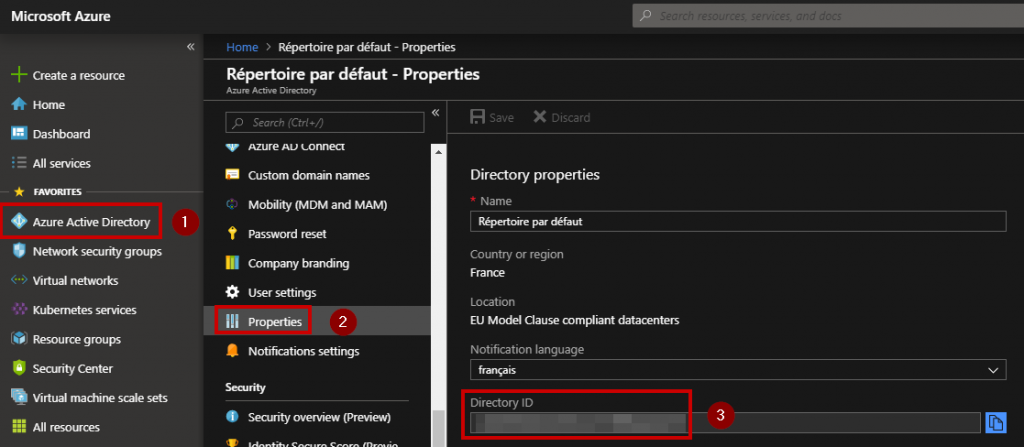
- You must copy and paste your Azure Active Directory ID as shown below:

Open a web browser, and go to the following URL: https://console.developers.google.com/. Log in with your Google account dedicated for the federation. If you do not have an existing Google account, follow these steps to create the account:

In the Dashboard home page, click “Create” to start a new project.

Enter a unique project name to identify the federation, and then click “Create“:

Select this project in the drop down menu and navigate to “Credentials” section:

Now, select “OAuth consent screen” and enter a friendly name for this Application:

Now, you must allow the “microsoftonline.com” domain in your project:

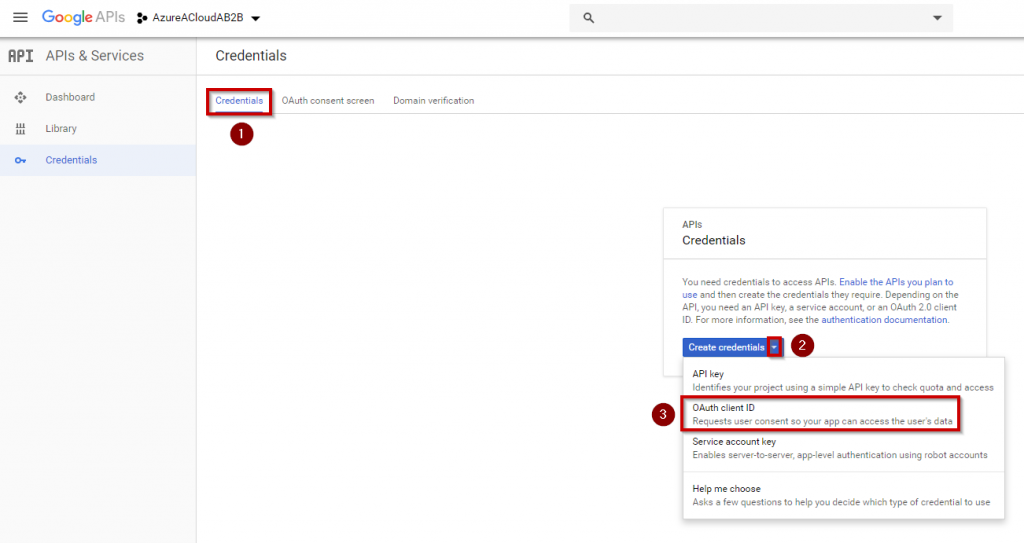
Click “Save” to apply these settings and go back to the “Credentials” tab. Click on “Create credentials” drop down menu and select “OAuth client ID”

Now, you must select “Web Application”, enter a friendly name for your Web App and then add the following URL:
- https://login.microsoftonline.com
- https://login.microsoftonline.com/te/xxxxxxxxxxxx/oauth2/authresp (xxxxx is your Azure AD ID – Remember the prerequisites at the beginning of the article!)

Click “Create” to apply these settings. A new Window will appear to generate your Client ID and your Client secret. You must copy and save it in a NotePad. You will need to use this ID in your Azure AD in order to initiate the relationship.

We can now go to the Azure Portal https://portal.azure.com in order to configure the federation. Go to the Azure Active Directory blade and select “Organizational relationships”

Navigate to “Identity Providers” and click “Google”

A new blade will appear. Enter the Client ID and Client secret that you saved previously in your NotePad.

Wait a few seconds …

The configuration is done! The federation should work, so we must test the process.
First, you must check that you can invite users with a Gmail address. Go to “User settings” in the Azure AD blade:

Select the first option to allow invitations to be sent to any domain. You can select the second option, which is a black list, or select the third option, which is a white list.

In my case, I want to manage easily my guest users, so I will create a group dedicated for this purpose.

In this group, I will invite my Google guest user. Click “Add members”

Enter the email address with a personal message and click “Invite”

Wait a few seconds …

I can confirm that my Google guest user is member of this group:

Check the Google mailbox and you will notice a new email as shown below:

Click “Get Started” or just go to the following URL: https://myapps.microsoft.com/xxxxx.onmicrosoft.com. Here, you must replace “xxxxxxxxxx” with your Azure verified domain. Why? It is a limitation because guest users are not able to sign in if the tenant context is missing.

Click “Next“, and you will notice that you will be redirected from the Azure login to Google login:

To finish, click “Next” to be redirected to the Azure Applications Portal:

Ok, so my guest user can access to the Applications Portal. I will now assign an Application to my guest user. I will not explain in this article how to assign an application to a user, so here I will assign WordPress. I just need to assign this App to the B2B group called “Groupe_B2B”.

Now, if I refresh the home page, I can notice the WordPress Application.

I can also monitor some interesting information about my guest user such as the number of user sign-ins.

If you go back to users section, you can now see “Google” in the source list.

Conclusion
Thanks to the Azure B2B Identity Provider, you can easily add Google as an identity provider, and then you can use Google accounts to log in to your Azure Infrastructure. This new feature is so cool, because you do not need to create an account in your Azure Active Directory.
If you need more information about pricing, you can read this article: https://azure.microsoft.com/en-us/pricing/details/active-directory/
If your guest users must access to paid services, please read the following article about licensing: https://docs.microsoft.com/en-us/azure/active-directory/b2b/licensing-guidance
Thanks for reading!
Related materials:

Views All Time
1

Views Today
3
The following two tabs change content below.
Filed under:
Microsoft, Services by Nicolas Prigent