Steam is a software content delivery system developed by Valve. There is some free software available but for the most part, the content delivered is non-free. In this article, we will describe two ways for you to install the Steam gaming platform on your Ubuntu:
- Through the official.deb package
- Though the Ubuntu Multiverse Repository
We will be using the Ubuntu command line, the Terminal, in order to make the installations. You can open the Terminal application either through the system Application Launcher Search or through the Ctrl+Alt+T shortcut.
Note: We have run the commands and procedures mentioned in this article on a Ubuntu 18.04 LTS system.
Method 1: Installation Through the official .deb package
Before downloading the .deb package that we will install Steam from, let us first take care of some prerequisites. Open the Terminal application and enter the following command to enable multiarch in order to achieve better compatibility for programs on your 64-bit Ubuntu system.
|
|
$ sudo dpkg --add-architecture i386 |

The next step is to update your system’s repository index through the following command:
This helps you in installing the latest available version of a software from the Internet.

Please note that only an authorized user can add, remove and configure software on Ubuntu. Let us now install the gdebi utility for .deb package installation and also some prerequisite packages for Steam through the following command:
|
|
$ sudo apt install wget gdebi-core libgl1-mesa-dri:i386 libgl1-mesa-glx:i386 |
Tip: Instead of typing the command, you can copy it from here and paste in the Terminal by using the Ctrl+Shift+V, or by using the Paste option from the right-click menu.

The system might ask you the password for sudo and also provide you with a Y/n option to continue the installation. Enter Y and then hit enter; the mentioned packages will be installed on your system. The process may, however, take some time depending on your Internet speed.
Now, download the Steam .deb installation package from the official SteamPowered website through the following wget command:
|
|
$ wget <a href="http://media.steampowered.com/client/installer/steam.deb">http://media.steampowered.com/client/installer/steam.deb</a> |

The package will be downloaded to the current folder; in my case-the current user’s /home folder.
Finally, run the gdebi command as follows in order to install the downloaded Steam .deb package:
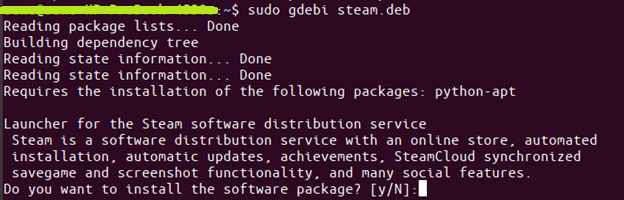
Enter Y and the software will be installed on your system.
Remove
If you ever want to remove Steam from your system installed through this method, you can do so through the following command:
|
|
$ sudo apt-get purge remove steam-launcher |

The purge command will remove the software, along with all the configurations you might have made after its installation.
Method 2: Installation through the Ubuntu Multiverse Repository
Another easy approach to install Steam from the command line is through the official Ubuntu Multiverse repository.
Open the Terminal and run the following command as sudo in order to enable the Multiverse repository:
|
|
$ sudo add-apt-repository multiverse |

Like all the latest versions of Ubuntu, the repository is already enabled on my system.
Now, run the following command so that you can install the latest version of Steam on your Ubuntu.

Finally, run the following simple apt-get command in order to install Steam on your Ubuntu:
|
|
$ sudo apt-get install steam |

The system might ask you the password for sudo and also provide you with a Y/n option to continue the installation. Enter Y and then hit enter; the software will be installed on your system. The process may, however, take some time depending on your Internet speed.
Remove
If you ever want to remove Steam installed through this method, you can do so through the following command:
|
|
$ sudo apt-get remove steam |
Launch and Setup Steam on Ubuntu
No matter which mentioned method you used for installation, you can launch Steam from the Ubuntu Application Launcher bar as follows, or directly access it from the applications listing:

You can also use the following command in your Terminal application to launch Steam.
As soon as you launch Steam for the first time, you will see the following progress bar in action:

This is an indication that the Steam launcher is updating steam by downloading the latest available version from the Internet. Once the download is complete, the following window will appear:

Through this window, you can either login to an existing account or, like me, opt to create a new one by click on the Create New Account button. Once you do so, the following Create an Account Window will appear:

Enter the required details, accept the terms and conditions, and then click the Continue button. As you do so, a verification email will be sent to your mentioned account. Open that account and verify your email so that Steam knows that you are the user who has to be connected to Steam.
Now come back to the Steam launcher on your Ubuntu and you will be able to see the following window:

Steam requires an account name and a password through which you will connect to it. Provide and available account name and a valid password and click on the Complete Sign-up button.
Now you are ready to log in to Steam through the following window:

As you login, you will be able to see the Steam application with the Store, Library, Friends, and
Community tabs. You can manage steam through the Steam icon now available on your top bar. This is how the menu should look like when you click on the Steam icon.

You are now ready to use and manage the Steam engine.
You can choose the download method depending on the source; the setup is pretty much the same for any method that you choose.
Related materials:

Views All Time
1

Views Today
1
The following two tabs change content below.
Filed under:
Software by Karim Buzdar