Icecast, according to the developers, is a streaming media (audio/video) server which currently supports Ogg (Vorbis and Theora), Opus, WebM and, MP3 streams. It can be used to create an Internet radio station or a privately running jukebox and many things in between. It is very versatile in that new formats can be added relatively easily and supports open standards for communication and interaction.
This article is about installing the Icecast media streamer on your Ubuntu. It also explains how you can customize the server settings through the Icecast configuration files.
Note: You can easily run the mentioned commands and procedures on a Ubuntu 18.04 LTS.
Installing Icecast
Icecast is luckily available through the official Ubuntu repositories and can be installed easily through the Ubuntu command line. The simplest way to open the Terminal is either through the Ctrl+Alt+T shortcut or through the Application Launcher search(accessible through the Super/Windows key).
If you want to install the latest version of a software available on the Internet repository rather than in the local ones, you need to update your system’s repository index.
Since adding, updating and configuring software on Ubuntu requires administrative privileges, we will run all such commands as a sudo user.
So, let us run the following command to update the apt-get index:

Now, run the following command as sudo in order to install the Icecast tool through apt:
|
|
$ sudo apt-get install icecast2 |

As you run the command, the following Package Configuration window will appear:

This window lets you make some basic configurations such as setting up a host name, the listening port, and some other authentication settings.
You can either select yes, by using the right and left keys and then hitting Enter, or leave the default configurations intact by selecting No.
As the Package Configuration process ends, the software will be installed on your system.
You can verify the installation of Icecast, and also view the installed version by using the following command:

Accessing the Admin Panel
The web interface of the Icecast utility is used to stream the audio files. It comes with an admin panel to let you monitor statistics as an Icecast administrator. In order to open this panel, open one of your web browsers and enter the server address, followed by port number, as follows:
http://example.com:PORT
OR
http://ADDRESS:PORT
Since I am using the default “localhost” as my server, I will open the server as follows:
http://localhost:8000/
This is how the default Icecast page looks like:

You can click the Administration tab and view the server statistics to it. The default login details are as follows:
Username: admin
Password: hackme
In case, you face any authentication problems, you can verify these details by opening the Icecast configuration file as follows:
|
|
$ sudo nano /etc/icecast2/icecast.xml |
Configuring Icecast
If you did not make any custom configurations at the time of installation, or you want to change the configurations thats you made, you can do so by editing the /etc/icecast2/icecast.xml file.
Important: Whenever you make any configuration changes to Icecast, you need to restart the Icecast service.
Here are some of the common settings you can change:
Change hostname and listening socket
The default hostname used by the Icecast service is “localhost” and it listens on port number 8000 by default. If you want to change these details, open the configuration file /etc/icecast2/icecast.xml in one of the available text editors. We will be using the Nano editor to open the files as follows:
|
|
$ sudo nano /etc/icecast2/icecast.xml |
Spot and edit the <hostname> and <port> tags to change their details respectively.

After making the changes, you need to save the file by using the Ctrl+X shortcut, entering Y, and then using the enter key.
Change Authentication Details
In order to change the authentication details of “source”, “relay”, and “admin” users, open the configuration file as follows:
|
|
$ sudo nano /etc/icecast2/icecast.xml |
Spot the <authentication> tag; you can change the password of any user from here.

After making the changes, you need to save the file by using the Ctrl+X shortcut, entering Y, and then using the enter key.
Use the Icecast Server on privileged ports
In order to run the Icecast server on any of the privileged ports like http 443 or http 80, you need to bind these ports as follows:
Open the icecast.xml file as follows:
|
|
$ sudo nano /etc/icecast2/icecast.xml |
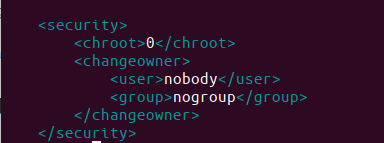
Spot the <security> tab and uncomment the <changeowner> section:

Your file should look like this now:
After making the changes, you need to save the file by using the Ctrl+X shortcut, entering Y, and then using the enter key.
Also, open the /etc/default/icecast2 file to tell Ubuntu to launch Icecast as root.
|
|
$ sudo nano /etc/default/icecast2 |
Spot the following section of the file:

Then change the USERID and GROUPID to root as follows:

After making the changes, you need to save the file by using the Ctrl+X shortcut, entering Y, and then using the enter key.
Managing the Icecast service
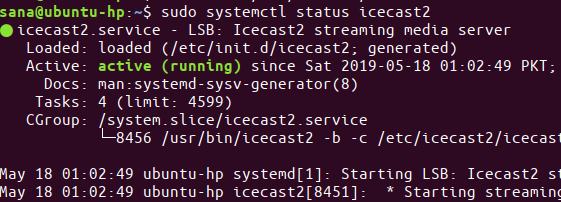
When you install Icecast, the Icecast service is enabled by default. You can check the status of the service as follows:
|
|
$ sudo systemctl status icecast |
After you reboot your system, the following commands will help you in starting and enabling the service:
|
|
$ sudo systemctl start icecast2 $ sudo systemctl enable icecast2 |
After you have made any configuration changes, the following command will let you register those changes:
|
|
$ sudo systemctl restart icecast2 |
The following command will help you in stopping Icecast:
|
|
$ sudo systemctl stop icecast2 |
This was all about installing, setting up, and configuring Icecast on your Ubuntu. This is just to get you started with Icecast; the real power of the tool comes when you are able to transmit audio to listeners using the Icecast server through stream relaying, transcoding, etc. Visit the following link to get detailed documentation about all the Icecast features:
https://icecast.org/docs/icecast-2.4.1/
Related materials:

Views All Time
1

Views Today
4
The following two tabs change content below.
Filed under:
Services, Software by Karim Buzdar