A TAR file or .tar file is an archive file that contains a single or several files. Normally, a Tar file is used in the distribution of sets of files over the internet.
A TAR file is not a compressed file, but it’s a format used to archive or merge several files into one file making it easy to transfer or distribute files. The name TAR stands for Tape Archive which is also the name of the file format and also the name of the utility used to access the archived files.
Originally, the format was designed for backing information or files on tapes; however, it is now widely used for downloads and application packages. TAR allows you to merge several files into one file thus making it easy to archive or transfer them.
TAR files do not run as a single file in the archive file; therefore, you need to extract the contents of the entire archive to access them. This means that the process can be a bit slow if you are interested in one file only.
A TAR file is mainly an archive file which does not involve any techniques that reduce the files sizes. You will need to use additional tools to compress or reduce the size of the archived files. TAR files are most popular on Linux and Unix systems which use tools such as BZIP2 or GZIP to compress the files. On windows, you can use BitZipper to compress the files.
Systems such as Unix and Linux have inbuilt utilities that help in accessing TAR files. If you want to open TAR files on Windows PC, you will have to download an additional tool that supports TAR files. Here is a simple guide on how you can open TAR files in Windows 10
While the guidelines and screenshots below show how you can access .tar files in Windows 10, if you are using an earlier Windows version, this guide will also be helpful. You should also note that the tool explained here is available free of charge and can also to be used to open other files formats such as .ARG and .RAR files. This tool will also help you to create .tar files on Windows PC.
Step 1
Head over to http://www.7-zip.org/ which is the official 7-Zip download page a tool that we will be using to access the TAR files. 7-Zip is a free to use Open Source program. Download the latest version which in this case is 7-Zip 16.04 (2016-10-04). This program is available in two versions; the 32-bit x86 version and the 64-bit x64 version. Therefore, you will have to download the version that matches the type of Windows you have. Double-click the downloaded file and follow instructions to install the App

Step 2
Locate the TAR/ .tar.gz file which contains the content you want to access or extract and double-click it.

Step 3
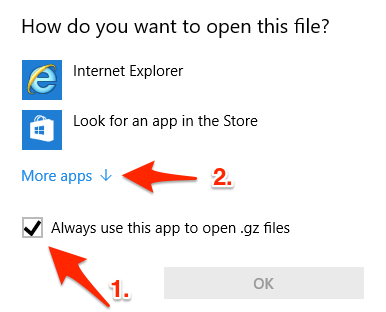
You will be asked ‘How do you want to open this file?’ First, locate the box labeled ‘Always use this app to open .gz files’ and check it. Then click on More apps ↓ located just above the box you have checked.
Step 4
Click on ‘Look for another app on this PC’ located below the list of the usual Windows applications.

Step 5
Here you will have to navigate through your computer to locate a specific file. Click on the top menu and head to your Program Files (x86). Look for a folder named 7-Zip and select it. If you cannot find the 7-Zip folder or Programs Files (x86), navigate inside the Programs Files folder that has no (x86) and looks for 7-Zip. Open the 7-Zip folder and look for a file named 7zFM or 7zFM.exe and double-click to open it.

Step 6
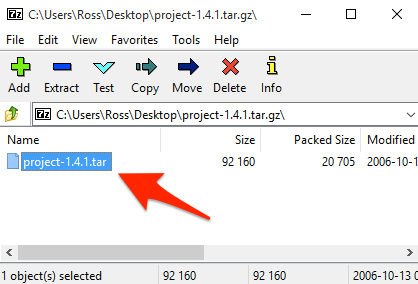
Here you will now be looking at the contents of the archived files or .gz part of the file which is also a .tar file. Double click on the .tar file as shown below
Step 7
Upon opening the .tar file you will now be looking at the files that you are after. Select everything inside then open .tar file you want to extract to your PC and then click on the Extract button on top of your open window.

Step 8
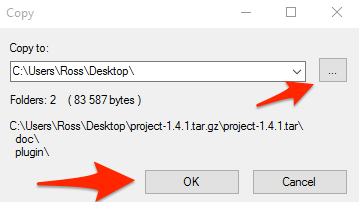
You will be prompted the location where you intend to extract your files to. Click the button as shown below and select the folders where you want to save/ extract the files to. It is highly recommended that you choose a location you can easily remember. In this scenario, I have opted for my Desktop. Then click OK.
Step 9
That’s it, you are done! You can now access, read or work on the files that were in your .TAR file.
Conclusion
Remember as stated earlier creating TAR files does not involve compressing, it just helps to archive files for easy sharing. If you have a small disk space, you can compress the TAR files, but then this will convert them to TGZ or GZIP files. If you need to compress your TAR files to save disk space, 7-Zip will help you with the same.
However, GZIP compressed archive cannot contain multiple files; thus you need to create a .tar archive first then use 7-Zip to create GZIP compression. It is also good to note that TAR also stands for ‘technical assistant request’ but this has nothing to do with .tar file archiving.
Related materials:

Views All Time
1

Views Today
3
The following two tabs change content below.
Filed under:
Software by Vladimir Yamkovoy