
Image 1. RDS session to Ubuntu Server 18.04 LTS AWS EC2 instance
In this article we will have a look at the process of setting up a connection to AWS EC2 instance running Ubuntu Server over internet (read “outside of Amazon cloud”/ “from anywhere”). More specifically, we will be looking at required settings and on how to initialize connection to Ubuntu EC2 instance from Windows client machine.
I won’t go into too much details on creation of Ubuntu Server EC2 instance as this process is covered quite well in AWS documentation and quite straightforward (rapid provisioning is one of the cloud benefits at the end of the day), but I will mention some key steps in this process which have an impact on connection process once instance is created.
For our discussion/tests we will be using t2.medium instance type with Ubuntu Server 18.04 LTS. It is recommended to select an instance type which has 4 GB of RAM minimum whenever you plan using remote desktop GUI access.
During instance creation process you will have an opportunity to create a security group and add access rules, with SSH rule added by default. At this step you can also add any additional rules, in case you have an idea about other types of connectivity you are going to use. You can also reuse pre-configured security group(s) you created earlier or accept default configuration as shown on the screenshot below:

Image 2. AWS EC2 instance creation wizard – Security Group Configuration step
Be sure to fill in both Security group name and Description fields, as both of them are mandatory in this wizard. As a final step during EC2 instance creation process we need to create a key pair (or select existing). This keypair will be required to connect to the instance over SSH.

Image 3. AWS EC2 instance creation wizard – Select / Create key pair step
Once your instance has been created and you saved private key file from associated key pair you can start the instance and establish SSH connection to it using PuTTY client for Windows. In case you don’t have this application just download a user friendly MSI installer and install it.
As a preliminary step, you will need to convert your private key .pem file to .ppk format required by PuTTY. This can be done using pyttygen.exe (GUI utility included with PuTTY), and to convert your key, you just start it and click on Load button to load .pem file:

Image 4. PuTTY Key Generator – Load Key
Be sure to select “All files” in File Explorer dialog as by default it looks for *.ppk files only while AWS provides private key in *.pem format:

Image 5. PuTTY Key Generator – Load Key – Browse Dialogue
If you selected correct file you will get a “Successfully imported foreign key message” message:

Image 6. PuTTY Key Generator – Successfully imported foreign key
Now you just need to save private key by means of clicking on “Save private key” button optionally specifying pass phrase for additional security (you will get an extra warning if you leave passphrase fields empty):

Image 7. PuTTY Key Generator – Save Key
In “Save private key as” dialog you’ll get next just need to select folder, specify meaningful file name and click on Save button to get your private key saved in PPK format.
With PPK key file we can now configure connection to our Ubuntu Server EC2 instance in PuTTY. First, we will need to copy Public DNS (IPv4) in EC2 console in multiple places as shown below (note that Description section in the bottom has useful icons to copy required values into clipboard):
 - img")
Image 8. AWS EC2 console – Public DNS (IPv4)
Once we copied Public DNS name for our started instance, we can launch PuTTY and under SSH > Auth specify path to private key file (PPK) you saved earlier using Browse button:
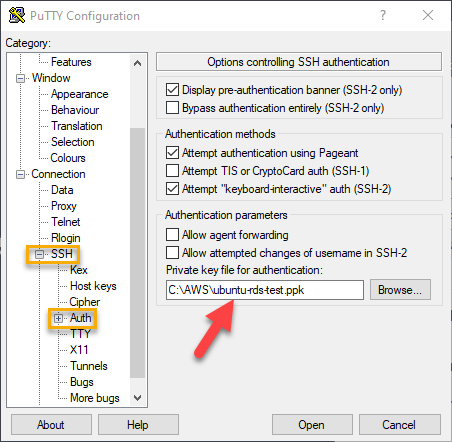
Image 9. PuTTY Configuration – Auth Key Settings
Next, go to session options and paste EC2 instance Public DNS name into “Host Name (or IP address)” field under Session options leaving rest of the settings without changes, and save your session settings specifying session name and clicking on Save button as shown below:

Image 10. PuTTY Configuration – Saving Session Settings
Important note: Without additional configuration your public DNS name and IPv4 address will be changing after each instance restart. Making them static will require some extra configuration (assigning so called elastic IP to your instance and so on).
Saved session will allow you to quickly load your session configuration in the future by means of selecting session name in the Saved Sessions list and clicking on Load (though in absence of static DNS/IP you will have to update host name after every instance restart). With session settings configured and saved you can click on Open to initialize SSH session. In the terminal window type in “ubuntu” in response to “login as” prompt:

Image 11. PuTTY Terminal connected to Ubuntu EC2 instance
Default username depends on image you are using and “ubuntu” is a default username for Ubuntu Server 18.04 LTS AMI image. In case you are using other images compiled list of default names can be found here (not an official resource, but it provides you with a good list). Essentially, at this stage we are connected to and can work with our Ubuntu EC2 instance through CLI, i.e. we can install packages, check and change settings or simply check on installed version using lsb_release -a command as shown below:

Image 12. PuTTY Terminal connected to Ubuntu EC2 instance – checking Ubuntu version
Now, let’s have a look on a GUI based remote desktop access over RDP. To be able to connect to desktop GUI via RDP we will need to install some additional packages. By default, Ubuntu includes Vino VNC server (remote desktop implementation based on RFB protocol and incompatible with RDP) which will require use of VNC client to connect, instead of using this option, we can install xrdp server package. Xrdp server is a free open-source implementation of Microsoft RDP server which’ll enable you to connect to Ubuntu Desktop using standard Microsoft Remote Desktop Services client and standard port 3389. In addition to xrdp package itself, we will need to install desktop environment (Ubuntu desktop system).
Let’s install two packages ubuntu-desktop (Ubuntu desktop system) and xrdp (RDP server) by issuing the sudo apt update (to update the APT package index with latest changes in repositories) and sudo apt install -y ubuntu-desktop xrdp (to install packages) commands as shown below:

Image 13. PuTTY Terminal connected to Ubuntu EC2 instance – installing xrdp and ubuntu-desktop packages
Once installation completed, we just need to allow default XRDP port 3389 in AWS security group rules. If required, you may adjust this port by means of editing xrdp.ini file (/etc/xrdp/xrdp.ini). To add a new security group rule we need to navigate to Security Groups section of AWS console, locate security group associated with our Ubuntu server instance and click on Edit on Inbound rules tab:

Image 14. AWS Console – Security Groups – Edit Inbound rules
In the edit inbound rules dialog you just click on Add Rule to add predefined RDP rule as shown below (you can specify source as 0.0.0.0/0 to allow connections from any IP or limit it to specific IP address) and click on Save:

Image 15. AWS Console – Edit Inbound rules dialogue
We are now almost ready to connect using Windows RDP client, but before doing that we need to configure a password for our Ubuntu user account using sudo passwd %user_name% command in PuTTY terminal session as shown below:

Image 16. PuTTY Console – Setting user password
Now we can just launch Windows Remote Desktop Connection client (mstsc.exe) and paste our instance name and click on Connect button:

Image 17. Remote Desktop Connection – Connect Dialogue
You will see standard “identity of the remote computer cannot be verified” warning (you can tick respective check box to suppress it during subsequent connection attempts) – just click Yes there:

Image 18. Remote Desktop Connection – “identity of the remote computer cannot be verified” warning
You will next be presented with xrdp login window:

Image 19. Remote Desktop Connection – xrdp login
Just type in your username and password and click OK. You will see Ubuntu Desktop Welcome wizard (potentially with some device setup related password prompts):

Image 20. Remote Desktop Connection – Connection to Ubuntu Desktop established
Congratulations! If you followed these steps, you are now able to connect to your Ubuntu Server AWS EC2 instance both over SSH and Windows RDP client. In case you would like to read up a bit more about Ubuntu remote access and setting up your Linux EC2 instance you can check out resources listed below. Thanks for reading and feel free to post your questions and feedback in the comments section below.
Additional resources:
Ubuntu Internet and Networking – VNC/Servers overview
Getting Started with Amazon EC2 Linux Instances
Related materials:

Views All Time
2

Views Today
3
The following two tabs change content below.
Filed under:
Services by Mikhail Rodionov