Introduction
In computing, a virtual machine (VM) is an emulation of a computer system. Virtual machines are based on computer architectures and provide functionality of a physical computer. Their implementations may involve specialized hardware, software, or a combination.
There are different kinds of virtual machines, each with different functions:
– System virtual machines (also termed full virtualization VMs) provide a substitute for a real machine. They provide functionality needed to execute entire operating systems. A hypervisor uses native execution to share and manage hardware, allowing for multiple environments which are isolated from one another, yet exist on the same physical machine. Modern hypervisors use hardware-assisted virtualization, virtualization-specific hardware, primarily from the host CPUs.
– Process virtual machines are designed to execute computer programs in a platform-independent environment.
Some virtual machines, such as QEMU, are designed to also emulate different architectures and allow execution of software applications and operating systems written for another CPU or architecture. Operating-system-level virtualization allows the resources of a computer to be partitioned via the kernel’s support for multiple isolated user space instances, which are usually called containers and may look and feel like real machines to the end users.
Environment:
- Server: aclouda
- OS: Centos 7
- IP Address: DHCP
- Login: root
- Password: Cby[hjafpfnhjy
Guide
Step 1: Storage Configuration
Here, we will create 10GB of LVM disk on the target server to use as a shared storage for clients. Let’s list the available disks attached to the target server using below command.

From the above output, you can see that my system has a 100GB of the disk (/dev/sdb). We will create a 10GB partition on the above disk and will use it for LVM. You can go to next step if you don’t need LVM.
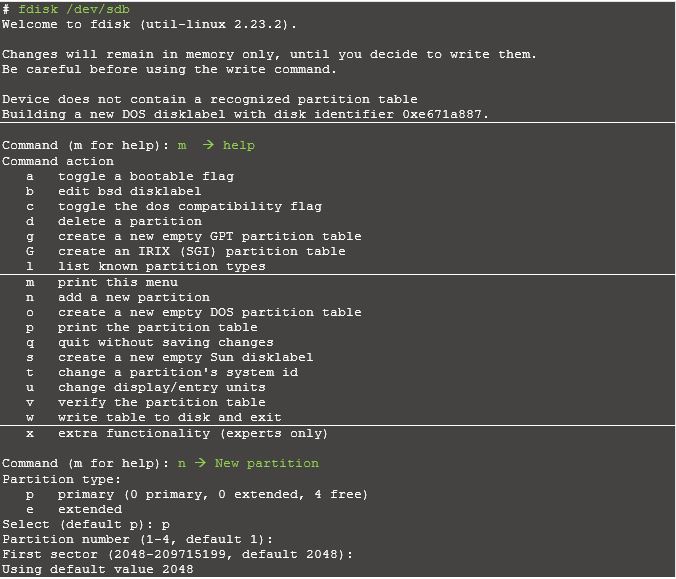
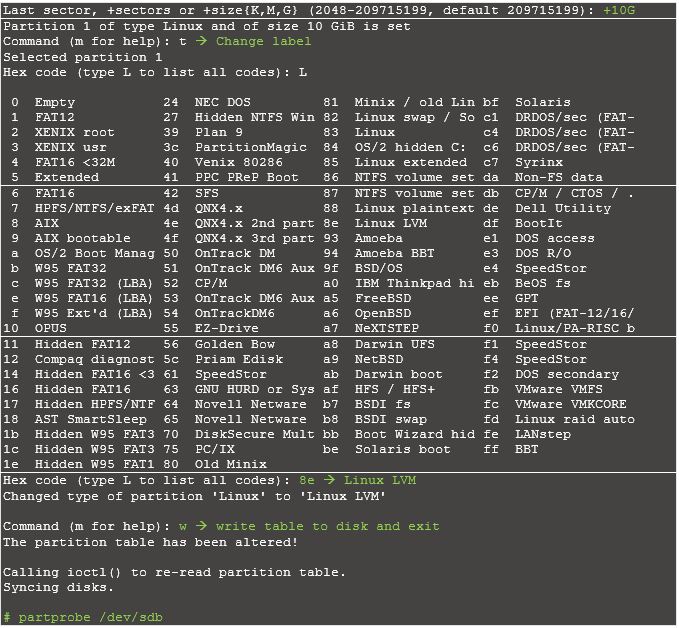
Create a LVM with /dev/sdb1 partition

Step 2: Configuring iSCSI Targets with CHAP authentication
Now you have an option of creating target either with authentication or without authentication. In this manual, you can find steps for both scenarios. It is up to you to decide which one is suitable for your network.
Configuring iSCSI Targets with CHAP authentication:

Now use an existing logical volume (/dev/vg_iscsi/Lun1) as a block-type backing store for storage object “iscsi_lun1“.

Create a target.

Create ACL for client machine (It’s the IQN which clients use to connect)

Create a LUN under the target, The LUN should use the previously mentioned backing storage object named “scsi_disk1_server”

Save and exit from CLI

Enable and restart the target service.

Step 3: Configuring iSCSI Targets without CHAP authentication
Create a target.

Create ACL for client machine (It’s the IQN which clients use to connect).

By default authentication is enabled, disable it.

Create a LUN under the target, The LUN should use the previously mentioned backing storage object named “scsi_disk1_server”

Reset configuration:

Conclusion
We created and configure 10GB of LVM disk on the target server for use as a shared storage for clients.
More information:
If you need more detailed information about TargetCli you may read it here.
Fill the form below to get Extended version of this Guide