What is it about ?
Storage Spaces Direct allows you to create a highly available, highly scalable program-defined storage on the basis of standard servers with local drives, at a lower cost than using traditional SAN or NAS arrays
Now this is a very rapidly developing direction in the IT industry and a lot of clients around the world are looking towards such solutions because of their relative cheapness, practicality and ease of scaling.
However, in such solutions only SSD (for system and quick availability data) and HDD (for large amount of data storage) are used and there is no possibility to use cloud data storage (for example AWS, Azure, GCP, etc.) for the “limitless” volume of stored data.
We offer you a solution capable of combining the convenience and speed of vSAN with the reliability and availability of Cloud data storage.
Benefits
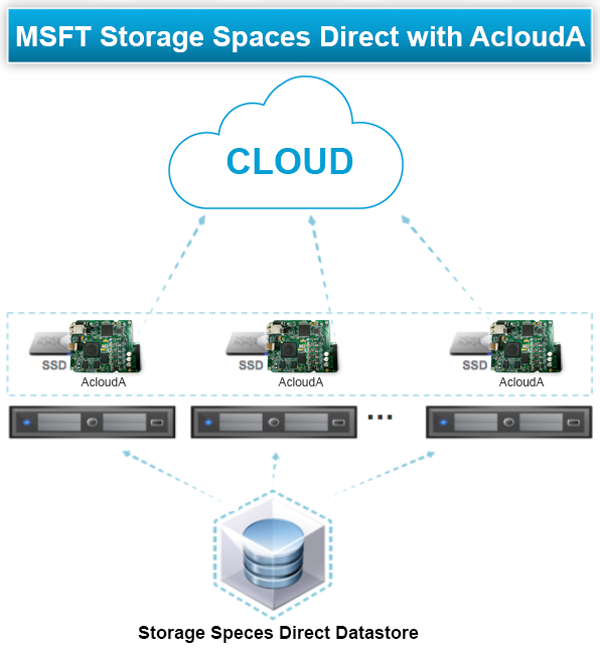
Using our AcloudA device, you can connect a cloud data storage (for example AWS, Azure, GCP, etc.) instead of one or more, for fault tolerance, hard drives.
You will be able to transfer your CapEx to OpEx, since you will not have to buy new servers to store an increasing amount of data, and you will be able to pay only for the storage you use.
You can easily and quickly increase the space for storing your data in one click as needed.
In addition, data storage in cloud storage is more reliable than conventional storage methods and is consistent with data storage rule 3-2-1.
Introduction
Storage Spaces Direct allows you to create a highly available, highly scalable program-defined storage on the basis of standard servers with local drives, at a lower cost than using traditional SAN or NAS arrays.
The convergent or hyperconvergent architecture of this solution simplifies procurement and deployment, and features such as caching, tiered storage with the RDMA network and NVMe drives provide unprecedented efficiency and performance.
Prepearing
Before we begin the deployment of Storage Spaces Direct, we need to prepare an action field.
To deploy Storage Spaces Direct, we need a cluster based on Windows Server 2016 datacenter. Additionally, to configure the cluster, we need a domain controller. Setting up the controller is a separate topic, not relevant to this article, it is assumed that you have it. I also recommend that you read the original Microsoft documentation.
This instruction created to understand the process of connecting Aclouda, and not a detailed guide to configuring the cluster and my goal does not require cluster stability, and show how to configure S2D + Aclouda – I will not configure the witness for the cluster and duplicate the network interfaces, due to than we need only 2PC based on Intel core i5 or similar.
In each PC we install 1 Aclouda expansion board and 2 SSD drives, one of which is system, and the second one will be used for the cache (you can use HDD, but then you need to change the type of drive, I said at the end of the “Storage” Spaces Tier”).
Install Windows Server roles and features
Several Windows Server roles and features are used by this solution. It makes sense to install them all at the same time, then perform specific configuration tasks later. To make this installation quick and easy, use the following PowerShell script:
|
|
Install-WindowsFeature -Name File-Services Install-WindowsFeature -Name Failover-Clustering -IncludeManagementTools Install-WindowsFeature -Name Hyper-V -IncludeManagementTools -Restart |
Note that it is a good idea to install the Hyper-V role on all nodes even if you plan to implement the disaggregated solution. Although you may not regularly use the storage cluster to host VMs, if the Hyper-V role is installed, you will have the option to deploy an occasional VM if the need arises. Once the roles and features have been installed and the nodes are back online, operating system configuration can begin.
Configure the operation system
Next, we configure the operating system, including Windows Update, AD Domain join, and internal drive verification.
Next, we configure the operating system, including Windows Update, AD Domain join, and internal drive verification. To ensure that the latest fixes and patches are applied to the operating system, perform updating of the Windows Server components via Windows Update. It is a good idea to reboot each node after the final update is applied to ensure that all updates have been fully installed, regardless what Windows Update indicates. Upon completing the Windows Update process, join each server node to the Windows Active Directory Domain. Use the following PowerShell command to accomplish this task.
PowerShell command to add system to an Active Directory Domain:
|
|
Add-Computer –DomainName “DomainName” -Reboot |
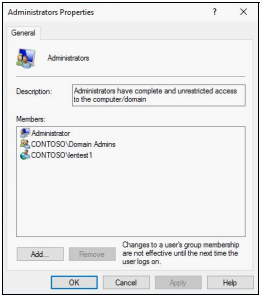
From this point onward, when working with cluster services be sure to log onto the systems with a Domain account and not the local Administrator account. Ensure that a Domain account is part of the local Administrators Security Group, as shown in Figure:
Verify that the internal drives are online, by going to Server Manager > Tools > Computer Management > Disk Management. If any are offline, select the drive, right-click it, and click Online. Alternatively, PowerShell can be used to bring all drives in each host online with a single command:
|
|
Get-Disk | ? FriendlyName -Like *ATA* | Set-Disk -IsOffline $False |
Since all systems have been joined to the domain, we can execute the PowerShell command remotely on the other hosts while logged in as a Domain Administrator. To do this, use the command shown in Example:
|
|
Invoke-Command -ComputerName S2D01, S2D02 -ScriptBlock { Get-Disk | ? FriendlyName -Like *ATA* | Set-Disk -IsOffline $False} |
Create the Failover Cluster and Enable Storage Spaces Direct
First of all you have to Configuring Aclouda on created Targets according to the instruction «Quick Start Guide» on Download page of AcloudA site.
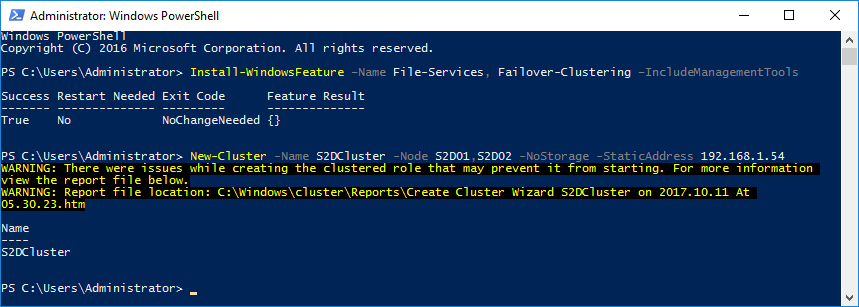
Before creating the Failover Cluster we need to validate the components that are necessary to form the cluster. As an alternative to using the GUI, the following PowerShell commands can be used to test and create the Failover Cluster:
- We create the new cluster:
|
|
New-Cluster -Name S2DCluster -Node S2D01,S2D02 -NoStorage -StaticAddress “Cluster ip” |
If you have ‘failed’ starting test…:
|
|
Test-Cluster -Node S2D01, S2D02 -Include Inventory, Network, "System Configuration" |
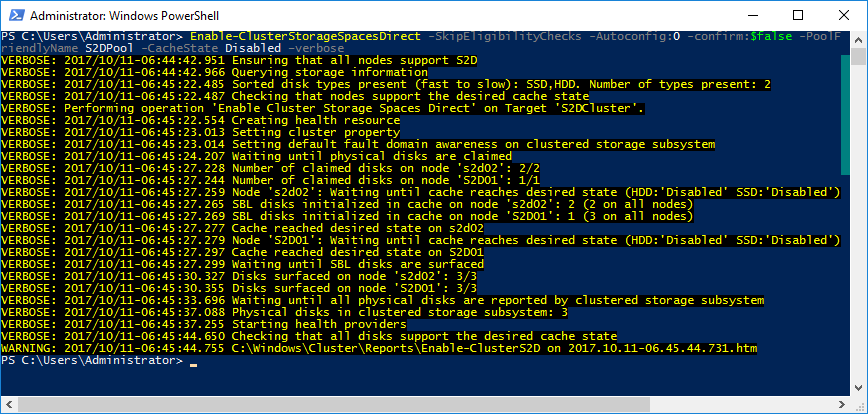
- Enable Storage Spaces Direct with Cache Disabled and AutoConfig Off:
|
|
Enable-ClusterStorageSpacesDirect -SkipEligibilityChecks -Autoconfig:0 -confirm:$false -PoolFriendlyName S2DPool -CacheState Disabled –verbose |
- Create a new Storage Pool:
|
|
Get-StorageSubSystem *cluster* | New-StoragePool -FriendlyName S2DPool -WriteCacheSizeDefault 0 -ProvisioningTypeDefault Fixed -ResiliencySettingNameDefault Mirror -PhysicalDisks (Get-PhysicalDisk | ? CanPool -EQ $true) |

AcloudA device is always detected by the system like “Unspecified”, for continue installation, you have to manually change it’s type to HDD.
- Change the Media Types:
|
|
Get-PhysicalDisk | FT TriendlyName, Size, MediaType |
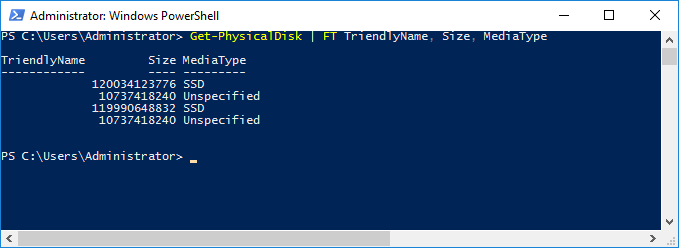
|
|
Get-Physicaldisk | where MediaType –eq Unspecified| Set-PhysicalDisk –MediaType HDD Get-PhysicalDisk | FT TriendlyName, Size, MediaType |

5. Manually Turn back on Caching
|
|
Get-Storagepool S2DPool | Get-PhysicalDisk | ? MediaType -EQ SSD | Set-PhysicalDisk -Usage Journal Get-PhysicalDisk | Sort-Object FriendlyName | ft FriendlyName,HealthStatus,Size,BusType,MediaType,usage |

|
|
Get-ClusterStorageSpacesDirect (Get-Cluster).S2DCacheDesiredState = 2 Get-ClusterStorageSpacesDirect |
This is it!
Create virtual disks
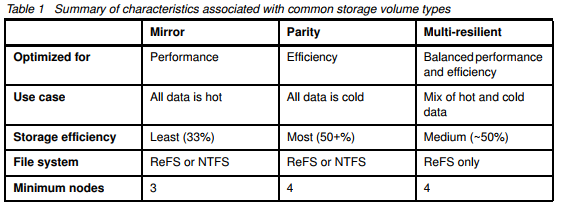
After the S2D cluster is created, create virtual disks or volumes based on your performance requirements. There are three common volume types for general deployments:
- Mirror
- Parity
- Multi-Resilient
Table shows the volume types supported by Storage Spaces Direct and several characteristics of each.
Use the PowerShell commands in Example to create and configure the virtual disks. Choose any or all types of volumes shown, adjusting the volume names and sizes to suit your needs. However, the amount of pool space consumed by each volume will depend on which Storage Tier is used. For example, the commands below create three volumes that consume a total of 88TB from the pool.
|
|
New-Volume -StoragePoolFriendlyName S2DPool -FriendlyName "Mirror" -FileSystem CSVFS_ReFS -StorageTierfriendlyNames Performance -StorageTierSizes 6TB |
Create a Parity Volume using the commands
|
|
New-Volume -StoragePoolFriendlyName S2DPool -FriendlyName "Parity" -FileSystem CSVFS_ReFS -StorageTierfriendlyNames Capacity -StorageTierSizes 24TB |
Create a Multi-Resilient Volume using the commands
|
|
New-Volume -StoragePoolFriendlyName S2DPool -FriendlyName "Resilient" -FileSystem CSVFS_ReFS -StorageTierfriendlyNames Performance, Capacity -StorageTierSizes 2TB, 8TB |
Once S2D installation is complete and volumes have been created, the final step is to verify that there is fault tolerance in this storage environment. The PowerShell command to verify the fault tolerance of the S2D storage pool and shows the output of that command in our environment.
PowerShell command to determine S2D storage pool fault tolerance
|
|
Get-StoragePool –FriendlyName S2DPool | FL FriendlyName, Size, FaultDomainAwarenessDefault |
To Query the virtual disk, use this command. The command verifies the fault tolerance of a virtual disk (volume) in S2D and Figure 24 shows the output of that command in our environment
PowerShell command to determine S2D virtual disk (volume) fault tolerance
|
|
Get-VirtualDisk –FriendlyName | FL FriendlyName, Size, FaultDomainAwareness |
Over time, the storage pool may get unbalanced because of adding or removing physical disks/storage nodes or data written or deleted to the storage pool. In this case, use the PowerShell command shown down to improve storage efficiency and performance.
PowerShell command to optimize the S2D storage pool
|
|
optimize-storagepool S2DPool |
Conclusions
We build highly available storage system (using Windows Server 2016 Storage Spaces Direct) with AcloudA device without local storage – only Cloud storage.
This eliminates the need for a shared SAS fabric and its complexities, but also enables using devices such as SATA SSDs, which can help further reduce cost or NVMe SSDs to improve performance.
Fill the form below to get Extended version of this Guide